Why You'll Love It
- - The cheese pulls apart in delightful strings
- - A quick bake makes it ready for any occasion
- - Mild heat from Mexican spices balances the richness
- - Easy to share with family or friends
"The perfect quick bite—cheesy, crispy, and utterly satisfying!"
Essential Ingredient Guide
- Tortillas: Choose fresh, small flour tortillas; they hold the cheese well and crisp nicely when baked.
- Cheddar cheese: Sharp cheddar adds a bold flavor; grate it finely for even melting.
- Breadcrumbs: Panko breadcrumbs give a light, airy crunch without becoming soggy.
- Cumin and paprika: These spices bring a warm, earthy depth that reminds you of classic tacos.
- Lime juice: A splash brightens the flavor, cutting through the richness of the cheese.
- Honey (optional): A tiny drizzle can balance the spice with a hint of sweetness if desired.
Complete Cooking Process
-
Ingredient Readiness:
Gather tortillas, grate cheese, and mix spices; keep everything at room temperature so the cheese melts evenly.
-
Flavor Development:
Combine cumin, paprika, and a pinch of salt with the cheese; the aromas begin to mingle even before cooking.
-
Texture Control:
Coat each cheese‑filled tortilla in beaten egg, then roll in panko for that satisfying crunch.
-
Finishing Touches:
Bake until golden, then drizzle with a whisper of lime juice for brightness.
-
Serving Timing:
Serve hot, straight from the tray, while the cheese is still stretchy and the exterior crisp.
- Pat the tortillas dry before filling to prevent sogginess.
- Freeze the assembled sticks for 10 minutes; they hold their shape better.
- Use a convection oven for an even golden crust.
- Serve with a cool avocado dip for contrast.
Pro Tips
Well, those little tricks make a big difference. I remember trying them once and the sticks held together perfectly, even when I nudged them onto a plate. It’s those tiny adjustments that turn a good snack into a memorable one.
The essence of the dish:
A fun fact or historical angle:
Flavor or sensory focus:
You Must Know
- Do not over‑fill the tortillas; it makes sealing difficult.
- Keep the oven door closed to maintain heat.
- Allow a brief rest after baking for the cheese to set.
Frequently Asked Questions
→ Can I use corn tortillas instead?
Yes, corn tortillas work, but they may be more fragile; handle gently and consider a double‑coating of breadcrumbs.
→ What cheese works best?
Sharp cheddar is ideal for flavor, though a blend with Monterey Jack adds extra melt.
→ How do I make them gluten‑free?
Swap regular panko for a gluten‑free breadcrumb or crushed cornflakes.
→ Can I freeze them?
Absolutely; place baked sticks on a tray to freeze, then transfer to a bag. Re‑bake from frozen for a crisp finish.
→ What dipping sauce pairs well?
A cool avocado‑lime crema or a simple salsa verde balances the richness nicely.
→ How long can leftovers be stored?
Store in an airtight container in the fridge for up to three days; reheat in the oven to restore crunch.
Chef's Tips
If you prefer extra heat, sprinkle a pinch of cayenne before baking.,For an even deeper flavor, let the assembled sticks rest for 10 minutes before cooking.,A quick spritz of water on the sticks before baking can enhance crust formation.
Nutrition Facts
per serving
320
Calories
14g
Protein
26g
Carbs
18g
Fat
Taste Profile
Rich cheese with gentle taco spices and a bright citrus hint
Ingredient Substitutions
Don't have an ingredient? Try these alternatives
Maintains meltiness while adding a slightly different flavor.
Gives extra crunch and keeps it gluten‑free if needed.
Recipe Variations
Try these delicious twists on the original
Spicy Version
Add 1 tsp crushed red pepper flakes and a drizzle of sriracha for a kick.
Mediterranean Style
Mix feta and chopped olives into the cheese, and sprinkle oregano before baking.
Common Mistakes to Avoid
Learn from others' mistakes for perfect results
- Overfilling tortillas, which can cause leakage.
- Skipping the egg wash, resulting in loose breadcrumb coating.
- Baking at too low a temperature, leading to soggy sticks.
Meal Prep & Storage
Make Ahead Tips
You can assemble the sticks, coat them, and freeze for up to 24 hours before baking; just add a few extra minutes to the bake time.
Leftover Ideas
Reheat gently in a preheated oven at 350°F for 8‑10 minutes to restore crispness.
Perfect Pairings
Serve this with...
Cooking Timeline
Gather and prep all ingredients; preheat oven.
Assemble cheese‑filled tortillas and coat with egg and breadcrumbs.
Bake sticks until golden, then drizzle with lime juice.
Plate and serve with chosen dip.

Cheesy Taco Sticks
Crispy, cheesy taco sticks that melt in your mouth while the seasoned exterior gives a satisfying crunch—perfect for a quick snack or a relaxed meal.
Timing
Prep Time
15 Minutes
Cook Time
20 Minutes
Total Time
35 Minutes
Recipe Details
Ingredients
Main Ingredients
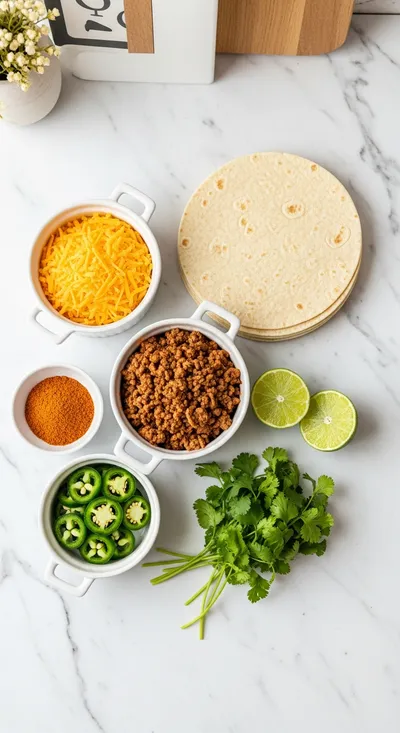
- 01 12 small flour tortillas
- 02 2 cups shredded sharp cheddar cheese
- 03 1 cup panko breadcrumbs
- 04 2 large eggs, beaten
- 05 1 tsp ground cumin
- 06 1 tsp smoked paprika
- 07 1/2 tsp salt
- 08 1 tbsp lime juice
- 09 2 tbsp olive oil
Optional Dips
- 01 1 ripe avocado
- 02 2 tbsp sour cream
- 03 1 tsp lime zest
- 04 Salt to taste
Instructions
Preheat the oven to 400°F (200°C) and line a baking sheet with parchment paper.
Cut each tortilla in half, place a generous handful of shredded cheese on one half, then fold over and press gently.
In a shallow dish, whisk the eggs; in another, mix panko, cumin, paprika, and salt. Dip each cheese‑filled tortilla first in egg, then roll in the seasoned breadcrumb mixture.
Arrange the coated sticks on the prepared sheet, drizzle with olive oil, and bake for 12‑15 minutes until golden and crisp.
Remove from oven, drizzle with lime juice, and serve warm with your favorite dip.
Notes & Tips
- 1 If you prefer extra heat, sprinkle a pinch of cayenne before baking.
- 2 For an even deeper flavor, let the assembled sticks rest for 10 minutes before cooking.
- 3 A quick spritz of water on the sticks before baking can enhance crust formation.
Tools You'll Need
-
Baking sheet
-
Parchment paper
-
Sharp knife
-
Mixing bowls
-
Measuring spoons
-
Oven
Must-Know Tips
- Don't overcrowd the pan, Cook in batches if needed
- Let the cheese rest after baking, Allows the texture to set
- Taste as you go, Adjust seasoning with a pinch of salt
Professional Secrets
- Room temperature cheese, Ensures smooth melting
- High heat for the start, Creates a perfect golden crust
- Brief cooling before serving, Captures the best bite

Recipe by
AmeliaAmelia is a seasoned food blogger and recipe creator at CookDishWorld, where she blends culinary expertise with an unwavering love for sharing delicio ...
Get Delicious Recipes Weekly
Join 25,000+ home cooks getting our best recipes straight to their inbox.
Free forever • No spam • Unsubscribe anytime