Why You'll Love It
- - Whimsical presentation that delights kids and adults alike
- - Creamy, mildly seasoned filling that pairs well with fresh herbs
- - Quick to assemble, perfect for busy mornings
- - Uses pantry staples, no exotic ingredients needed
*"These little chick eggs are a hit at every brunch! So cute and tasty."*
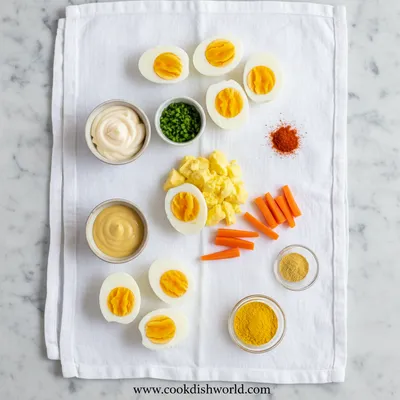
Essential Ingredient Guide
- Large eggs: Choose fresh eggs; older eggs peel more easily after boiling
- Mayonnaise: Full‑fat mayo gives a richer mouthfeel; room temperature mixes smoothly
- Dijon mustard: Adds subtle tang; a little goes a long way
- Paprika: Sprinkle on top for a gentle smoky aroma
- Fresh chives: Finely chopped for a bright, onion‑like lift
- Turmeric (optional): A pinch creates the sunny yolk‑beak hue without strong flavor
Complete Cooking Process
-
Ingredient Readiness:
Boil eggs, cool in ice water, peel, and halve; separate yolks for the creamy blend.
-
Flavor Development:
Mix yolks with mayo, mustard, and spices; the gentle whisk releases the aromatic notes.
-
Texture Control:
Pipe the mixture back into whites; avoid over‑mixing to keep a light fluffiness.
-
Finishing Touches:
Add a dab of turmeric‑mustard mix for the beak, sprinkle paprika, and garnish with chives.
-
Serving Timing:
Serve chilled, within an hour, so the colors stay vivid and the filling stays firm.
- Use a piping bag for neat, even filling
- Gently tap the eggs after boiling to crack the shell for easier peeling
- Taste the filling before stuffing; adjust mustard or mayo as needed
- Store assembled chicks covered with damp paper to keep whites moist
Pro Tips
These little tricks keep the deviled egg chicks looking picture‑perfect and tasting fresh. Honestly, a little patience at the piping stage makes all the difference; the final presentation feels like a tiny work of art on the plate.
The essence of the dish:
A fun fact or historical angle:
Flavor or sensory focus:
You Must Know
- Eggs should be fully cooled before peeling
- Do not over‑mix the filling; it stays airy
- Turmeric adds color, not flavor
Frequently Asked Questions
→ Can I make these ahead of time?
Yes, prepare the filling and pipe it into the whites up to 4 hours ahead; keep covered in the fridge.
→ What can I substitute for mayo?
Greek yogurt works well for a lighter version; keep the same amount for texture.
→ How do I get the bright yellow beak?
Mix a pinch of turmeric with a little mustard; it yields a vibrant hue without bitterness.
→ Are the chicks gluten‑free?
All ingredients listed are naturally gluten‑free.
→ What’s a good garnish?
Microgreens or tiny dill sprigs add a fresh pop and visual contrast.
→ Can I add cheese?
A sprinkle of grated Parmesan after piping adds a savory depth; just a light dusting.
Chef's Tips
For extra color contrast, add a tiny dab of food‑grade yellow dye to the filling of a few chicks.,If the eggs are very fresh, crack the shells before boiling to make peeling easier.,Use a small offset spoon for a tidy filling if no piping bag is available.
Nutrition Facts
per serving
120
Calories
6g
Protein
2g
Carbs
9g
Fat
Taste Profile
Creamy with a bright, tangy finish
Ingredient Substitutions
Don't have an ingredient? Try these alternatives
Provides a tangier taste and less fat; keep the same volume.
Adds a deeper, smoky aroma.
Recipe Variations
Try these delicious twists on the original
Spicy Version
Add a pinch of cayenne and a dash of hot sauce to the yolk mixture for a gentle kick.
Mediterranean Style
Stir in crumbled feta and chopped olives into the filling; garnish with tiny basil leaves.
Common Mistakes to Avoid
Learn from others' mistakes for perfect results
- Over‑mixing the yolk blend, which makes it dense
- Peeling eggs while still warm, causing tears in the whites
- Using too much turmeric, which can taste bitter
Meal Prep & Storage
Make Ahead Tips
Prepare the yolk filling up to 24 hours ahead; store in the fridge and pipe just before serving.
Leftover Ideas
Refrigerate assembled chicks in a sealed container; enjoy within two days, or re‑pipe fresh filling if texture changes.
Perfect Pairings
Serve this with...
Cooking Timeline
Gather all ingredients, set up a pot of water and bring to a boil.
Cook eggs, then transfer to ice water to stop cooking.
Peel eggs, halve them, and separate yolks from whites.
Blend yolks with mayo, mustard, spices, and optional turmeric.
Pipe filling into whites, add beak dots, garnish, and chill.
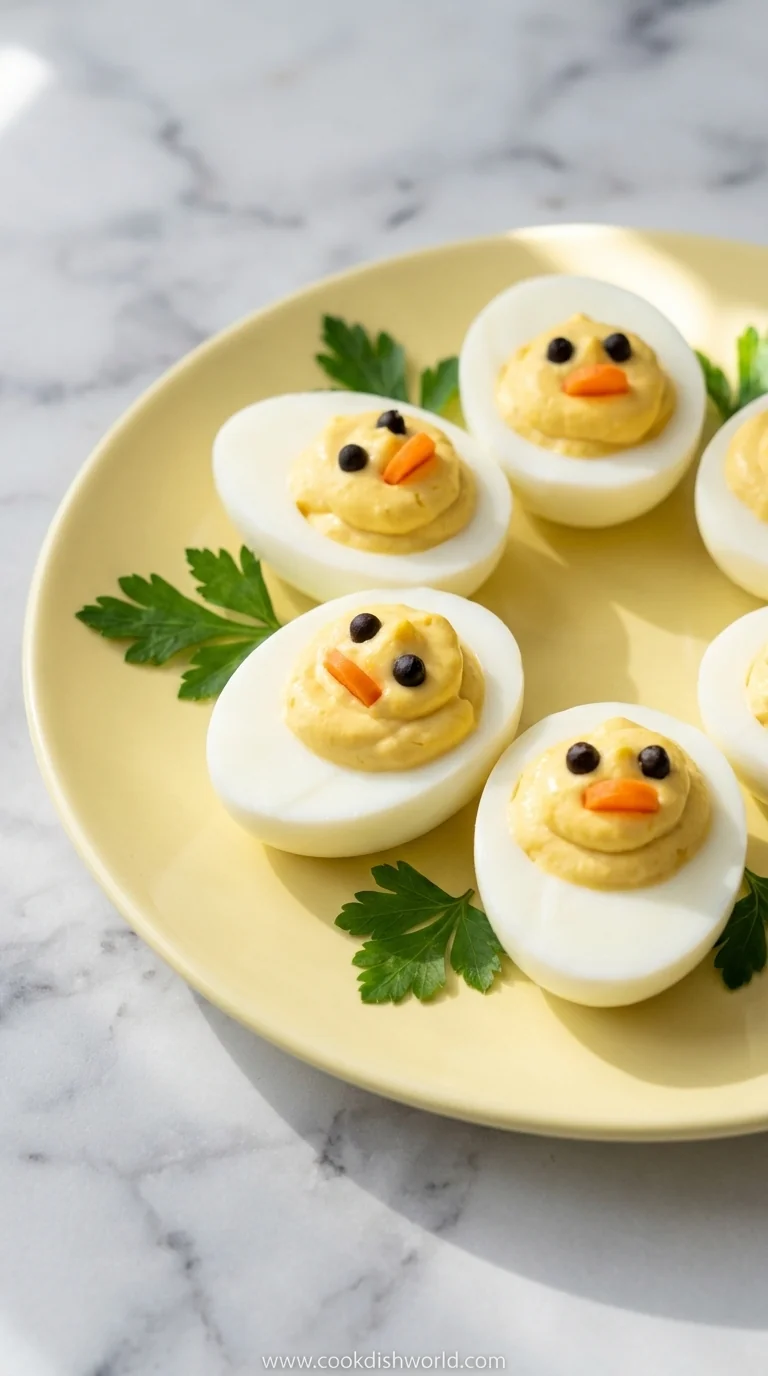
Deviled Egg Chicks – Cute Breakfast Treat
Adorable deviled egg chicks with creamy yolk fill and bright mustard beaks—perfect bite‑size breakfast or snack that brings smiles to the whole family.
Timing
Prep Time
15 Minutes
Cook Time
10 Minutes
Total Time
25 Minutes
Recipe Details
Ingredients
Eggs & Fillings
- 01 6 large eggs
- 02 3 tbsp mayonnaise
- 03 1 tsp Dijon mustard
- 04 1/4 tsp paprika
- 05 1 tbsp fresh chives, finely chopped
- 06 1/8 tsp turmeric (optional)
- 07 Pinch of salt and pepper
Garnish
- 01 Extra chives for sprinkling
- 02 Paprika for dusting
Instructions
Place the eggs in a saucepan, cover with cold water, bring to a boil, then simmer 9 minutes.
Transfer eggs to an ice bath, cool 5 minutes, peel, and slice each egg in half lengthwise.
Gently scoop out yolks into a bowl; mash with a fork and blend in mayo, mustard, turmeric, salt, and pepper until smooth.
Transfer the mixture to a piping bag fitted with a star tip; pipe into the egg‑white cavities, shaping a small mound.
Create beaks by mixing a pinch of turmeric with a dab of mustard, then dot the tip of each chick; finish with a sprinkle of paprika and chopped chives.
Notes & Tips
- 1 For extra color contrast, add a tiny dab of food‑grade yellow dye to the filling of a few chicks.
- 2 If the eggs are very fresh, crack the shells before boiling to make peeling easier.
- 3 Use a small offset spoon for a tidy filling if no piping bag is available.
Tools You'll Need
-
Saucepan
-
Ice bath bowl
-
Sharp knife
-
Cutting board
-
Fork
-
Mixing bowl
-
Piping bag with star tip
Must-Know Tips
- Don't overcrowd the pan when boiling; gives even cooking.
- Let the eggs cool completely before peeling; prevents tears.
- Taste the filling before piping; adjust seasoning gently.
Professional Secrets
- Room temperature eggs peel more cleanly; plan ahead.
- A light hand when mixing yolk blend keeps it airy.
- Use a chilled piping bag for smoother flow.

Recipe by
AmeliaAmelia is a seasoned food blogger and recipe creator at CookDishWorld, where she blends culinary expertise with an unwavering love for sharing delicio ...
Get Delicious Recipes Weekly
Join 25,000+ home cooks getting our best recipes straight to their inbox.
Free forever • No spam • Unsubscribe anytime