Why You'll Love It
- - No oven required, perfect for hot days
- - Creamy filling balances crunchy crust
- - Ready in under 30 minutes
- - Kid‑friendly and elegant enough for guests
*"This pie was the highlight of my family brunch—so easy, yet so impressive!"*
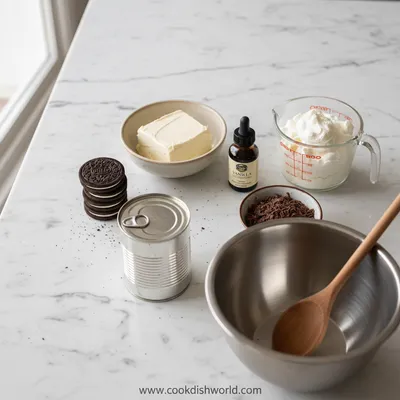
Essential Ingredient Guide
- Oreo cookies: Choose classic chocolate Oreos for authentic flavor; crush them finely for a smooth crust.
- Cream cheese: Room‑temperature cream cheese blends easily, creating a velvety base.
- Whipped topping: Adds airy lightness; fold gently to keep the filling fluffy.
- Sugar: A touch of granulated sugar sweetens the filling without overwhelming the cookie taste.
- Vanilla extract: Just a splash enhances depth and rounds the flavors.
- Chocolate shavings: Optional garnish that adds a hint of bitterness and visual charm.
Complete Cooking Process
-
Ingredient Readiness:
Gather all ingredients, let cream cheese soften, and crush the Oreos into fine crumbs.
-
Flavor Development:
Combine the crumbs with melted butter, press into the pan, then blend cream cheese, sugar, and vanilla.
-
Texture Control:
Fold in the whipped topping carefully, preserving the airy texture before chilling.
-
Finishing Touches:
Top with chocolate shavings or extra Oreo crumbs just before serving.
-
Serving Timing:
Allow the pie to chill for at least 2 hours; serve cold for the best contrast.
- Use a springform pan for easy removal
- Press the crust firmly to avoid cracks
- Whip the topping just until soft peaks form
- Chill longer for a firmer slice
Pro Tips
I’ve found that letting the pie rest longer than the minimum really lets the flavors meld. When the coolness settles, the cream cheese filling becomes silkier, and the crust stays crisp underneath. So, if you have the time, give it a little extra chill and watch how the slice holds together beautifully. It’s a small patience that rewards you with a perfect bite every time.
The essence of the dish:
A fun fact or historical angle:
Flavor or sensory focus:
You Must Know
- Crush cookies evenly for a smooth base
- Don’t over‑mix the filling
- Chill thoroughly before slicing
Frequently Asked Questions
→ Can I make this pie ahead of time?
Yes, assemble the pie up to 24 hours in advance and keep it refrigerated. The flavors will develop nicely.
→ What can I use instead of cream cheese?
Mascarpone or a blend of Greek yogurt and softened butter works as a substitute, though texture may vary slightly.
→ Do I need a springform pan?
A regular pie dish works, but a springform pan makes removal easier and keeps the crust intact.
→ How long should I chill the pie?
At least 2 hours, but 4 hours yields a firmer slice and better flavor melding.
→ Can I add fresh fruit?
Yes, berries or sliced bananas on top add a fresh contrast; add them just before serving.
→ Is this recipe gluten‑free?
No, because of the traditional Oreo cookies, but you can substitute gluten‑free chocolate sandwich cookies for a safe version.
Chef's Tips
Make sure the cream cheese is at room temperature; this prevents lumps.,Do not over‑mix the whipped topping, or it will become dense.,If the crust feels dry, add a teaspoon more melted butter.
Nutrition Facts
per serving
320
Calories
5g
Protein
34g
Carbs
18g
Fat
Taste Profile
Richly sweet with a buttery crunch
Ingredient Substitutions
Don't have an ingredient? Try these alternatives
Gives a richer flavor; keep the same quantity.
For a dairy‑free option; ensure it’s well‑chilled before folding.
Recipe Variations
Try these delicious twists on the original
Spicy Version
Add a pinch of cayenne pepper to the crust and a drizzle of chocolate chile sauce on top.
Mediterranean Style
Mix crumbled pistachios into the crust and top with a light honey drizzle.
Common Mistakes to Avoid
Learn from others' mistakes for perfect results
- Over‑mixing the whipped topping, causing it to lose air.
- Pressing the crust too lightly, leading to cracks.
- Not chilling long enough, resulting in a soft slice.
Meal Prep & Storage
Make Ahead Tips
You can prepare the crust and filling up to 24 hours ahead; keep them separate and assemble just before chilling.
Leftover Ideas
Refrigerate leftovers and enjoy within two days; bring slices to room temperature for a softer bite.
Perfect Pairings
Serve this with...
Cooking Timeline
Gather and prepare all ingredients; crush cookies.
Mix crumbs with melted butter and press into pan.
Blend cream cheese, sugar, and vanilla; fold in whipped topping.
Spread filling over crust and smooth top.
Cover and refrigerate for at least 2 hours.
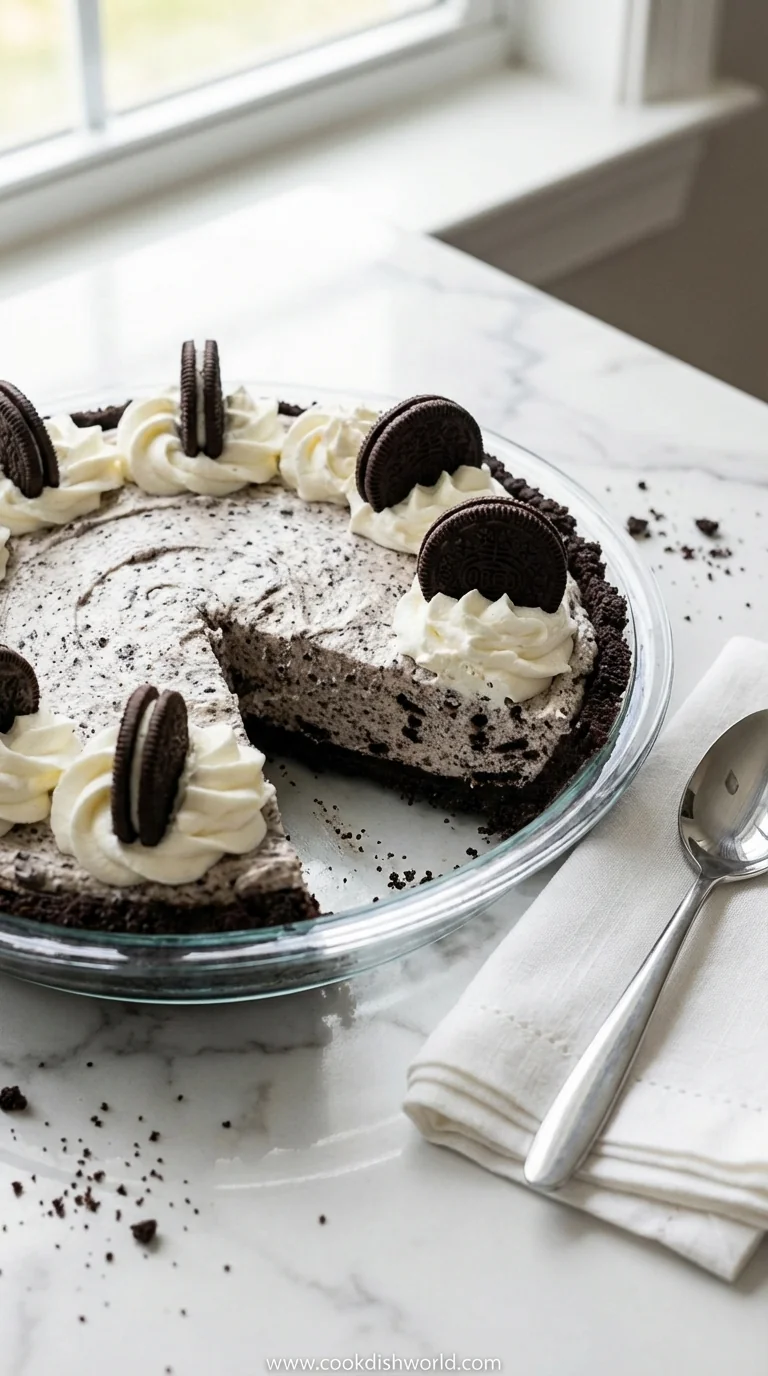
Easy Oreo Pie Recipe
A no‑bake Oreo pie that comes together in minutes, offering a creamy, crunchy dessert perfect for any gathering. The cookie crust and silky filling create a comforting contrast that feels both nostalgic and fresh.
Timing
Prep Time
15 Minutes
Cook Time
0 Minutes
Total Time
2 Hours 15 Minutes
Recipe Details
Ingredients
Crust
- 01 24 Oreo cookies, crushed
- 02 5 tbsp melted butter
Filling
- 01 8 oz cream cheese, softened
- 02 1/3 cup granulated sugar
- 03 1 tsp vanilla extract
- 04 1 cup whipped topping (cool whip style)
Garnish
- 01 Extra Oreo crumbs or chocolate shavings
Instructions
Place the crushed Oreos in a bowl, pour melted butter over them, and stir until evenly coated.
Press the crumb mixture firmly into the bottom of a 9‑inch springform pan, creating an even crust; set aside.
In a mixing bowl, beat the softened cream cheese until smooth, then add sugar and vanilla, mixing until creamy.
Gently fold the whipped topping into the cream cheese mixture, taking care not to deflate it.
Spread the filling over the prepared crust, smoothing the top with a spatula.
Refrigerate the pie for at least 2 hours, or until firmly set.
Before serving, sprinkle extra Oreo crumbs or chocolate shavings over the top for added texture.
Notes & Tips
- 1 Make sure the cream cheese is at room temperature; this prevents lumps.
- 2 Do not over‑mix the whipped topping, or it will become dense.
- 3 If the crust feels dry, add a teaspoon more melted butter.
Tools You'll Need
-
Food processor or zip‑lock bag and rolling pin
-
9‑inch springform pan
-
Mixing bowls
-
Hand mixer or stand mixer
-
Spatula
-
Measuring cups and spoons
Must-Know Tips
- Don't over‑mix the filling, keep it airy
- Let the crust set firmly by pressing firmly
- Taste the sweetener and adjust if needed
- Chill the pie long enough for clean slices
Professional Secrets
- Room temperature cream cheese blends evenly for a silkier texture
- Press the crust together with the back of a measuring cup for uniform thickness
- Fold whipped topping gently to preserve air bubbles

Recipe by
AmeliaAmelia is a seasoned food blogger and recipe creator at CookDishWorld, where she blends culinary expertise with an unwavering love for sharing delicio ...
Get Delicious Recipes Weekly
Join 25,000+ home cooks getting our best recipes straight to their inbox.
Free forever • No spam • Unsubscribe anytime