Why You'll Love It
- - Crunchy, colorful shells that melt in your mouth
- - No‑bake cheesecake filling for effortless prep
- - Fun, hand‑held presentation that sparks conversation
- - Easy to customize with fresh fruit or drizzle
*"These tiny tacos are a hit at every gathering—kids giggle, adults sigh with delight."*
Essential Ingredient Guide
- Fruity Pebbles cereal: Choose the brightest colors; they provide both flavor and a vibrant visual cue.
- Cream cheese: Use full‑fat cream cheese for the richest, creamiest texture.
- Powdered sugar: Sifts easily into the filling and balances the tartness of the fruit.
- Vanilla extract: A few drops lift the entire flavor profile, adding subtle warmth.
- Butter: Melted butter helps bind the cereal shell and adds a golden sheen.
- Whipped cream: Lightly folded in for a airy finish, keeping the filling from feeling heavy.
Complete Cooking Process
-
Ingredient Readiness:
Measure the cereal, melt butter, and soften cream cheese ahead of time; this ensures smooth shells and a lump‑free filling.
-
Flavor Development:
Combine the filling ingredients gently; let the vanilla perfume the mixture while the cereal shells bake to a crisp.
-
Texture Control:
Press the cereal mixture into taco molds before baking, then let cool completely to set the shape before adding the filling.
-
Finishing Touches:
Pipe the cheesecake filling into each shell, then crown with fresh berries or a drizzle of fruit glaze.
-
Serving Timing:
Serve the tacos chilled, about 10 minutes after filling, so the shells stay crisp and the filling stays firm.
- Use a silicone taco mold for even shells
- Chill the filling for at least 30 minutes for stability
- Don’t over‑bake; 5‑7 minutes is enough to set the shell
- Garnish just before serving to keep shells crunchy
Pro Tips
I find that a quick chill after assembling lets the flavors meld without losing that satisfying crunch. Honestly, the tiny imperfections in the shell shape add character, so don’t worry if they’re not perfect. It’s the taste that matters, and this dessert delivers a sweet, nostalgic bite every time.
The essence of the dish:
A fun fact or historical angle:
Flavor or sensory focus:
You Must Know
- Shells must be cooled before filling
- Filling should stay chilled
- Garnish adds extra brightness
Frequently Asked Questions
→ Can I make the shells ahead of time?
Yes, store them in an airtight container for up to two days; they’ll stay crisp if kept dry.
→ What if I’m allergic to gluten?
All ingredients are naturally gluten‑free; just verify the cereal label for any cross‑contamination.
→ Can I use a different cereal?
Feel free to swap Fruity Pebbles for another colorful puffed rice cereal; the texture will change slightly.
→ How long can the filled tacos be refrigerated?
They’re best served the same day, but you can keep them refrigerated for up to 24 hours; the shells may soften slightly.
→ Is there a dairy‑free version?
Replace cream cheese with a plant‑based cream cheese and use coconut whipped cream for the same creamy feel.
→ Can I freeze these tacos?
Freezing isn’t recommended because the shells can become soggy after thawing.
Chef's Tips
If you prefer a no‑bake cheesecake vibe, you can set the filling in the fridge for 15 minutes before filling the shells.,For a tangier bite, add a teaspoon of lemon zest to the filling.,Use a silicone spatula to press the cereal gently; over‑pressing can make shells too dense.
Nutrition Facts
per serving
210
Calories
5g
Protein
22g
Carbs
12g
Fat
Taste Profile
A sweet, tangy dessert with a bright, crunchy exterior.
Ingredient Substitutions
Don't have an ingredient? Try these alternatives
Provides a similar sweetness with a hint of caramel.
Keeps the recipe dairy‑free while adding a subtle coconut flavor.
Recipe Variations
Try these delicious twists on the original
Spicy Version
Add a pinch of cayenne to the filling and garnish with a jalapeño slice for a surprising kick.
Mediterranean Style
Swap Fruity Pebbles for toasted pita crumbs, fill with honey‑sweetened cheese, and top with pistachios.
Common Mistakes to Avoid
Learn from others' mistakes for perfect results
- Over‑baking shells, leading to a hard texture.
- Filling shells while still warm, which can melt the filling.
- Using low‑fat cream cheese; it makes the filling grainy.
Meal Prep & Storage
Make Ahead Tips
You can bake the shells up to a day ahead; keep them airtight. Fill them just before serving for maximum crunch.
Leftover Ideas
Reheat shells briefly in a 300°F oven for 3 minutes to revive crunch, then add fresh filling.
Perfect Pairings
Serve this with...
Cooking Timeline
Gather and measure all ingredients; preheat oven.
Combine cereal with butter and honey; press into molds and bake.
Prepare cheesecake filling while shells bake; chill filling.
Cool shells, fill with cheesecake, garnish, and serve.
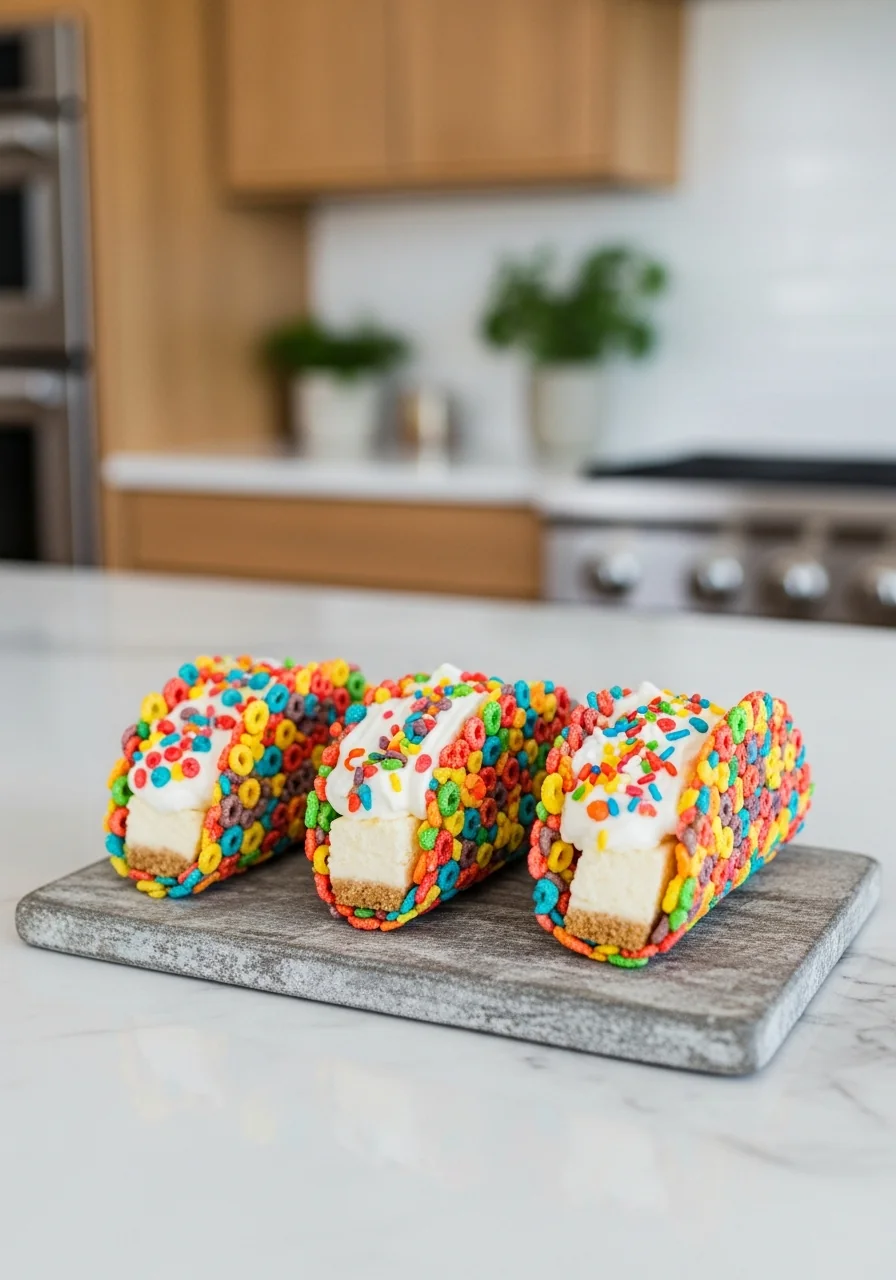
Fruity Pebbles Cheesecake Tacos
A playful dessert where crunchy Fruity Pebbles form a taco‑shaped shell that cradles sweet, velvety cheesecake filling, perfect for celebrations or a quiet treat.
Timing
Prep Time
20 Minutes
Cook Time
10 Minutes
Total Time
30 Minutes
Recipe Details
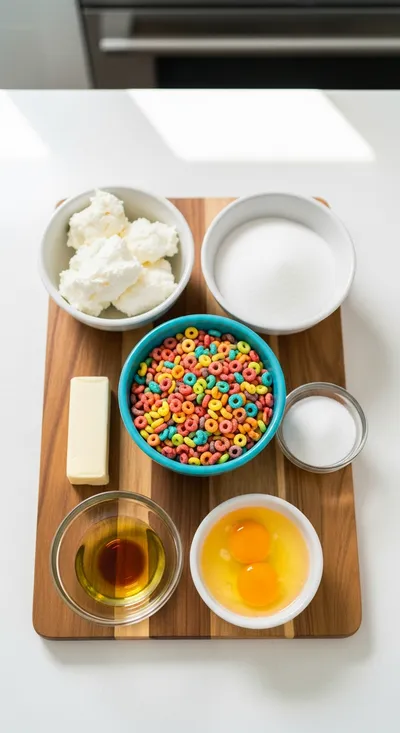
Ingredients
For the Shells
- 01 2 cups Fruity Pebbles cereal
- 02 3 tbsp unsalted butter, melted
- 03 1 tbsp honey
For the Cheesecake Filling
- 01 8 oz cream cheese, softened
- 02 1/4 cup powdered sugar
- 03 1 tsp vanilla extract
- 04 1/2 cup whipped cream
- 05 Optional: fresh berries for garnish
Instructions
Preheat the oven to 350°F (175°C). Line a baking sheet with parchment.
In a bowl, combine Fruity Pebbles, melted butter, and honey; stir until the cereal is lightly coated.
Press the mixture into silicone taco molds (or a made‑up shape) about 1/4‑inch thick. Bake for 5‑7 minutes until set and golden.
While shells bake, beat cream cheese, powdered sugar, and vanilla until smooth. Gently fold in whipped cream.
Allow shells to cool completely, then carefully remove from molds.
Pipe or spoon the cheesecake filling into each shell, garnish with berries or a drizzle of fruit glaze.
Notes & Tips
- 1 If you prefer a no‑bake cheesecake vibe, you can set the filling in the fridge for 15 minutes before filling the shells.
- 2 For a tangier bite, add a teaspoon of lemon zest to the filling.
- 3 Use a silicone spatula to press the cereal gently; over‑pressing can make shells too dense.
Tools You'll Need
-
Silicone taco mold
-
Mixing bowls
-
Hand mixer or whisk
-
Measuring cups and spoons
-
Baking sheet
-
Piping bag or spoon
Must-Know Tips
- Don’t over‑bake the shells; they’ll harden too much.
- Chill the filling for a firmer texture.
- Fill the shells just before serving to keep them crisp.
Professional Secrets
- Room temperature cream cheese blends smoother, avoiding lumps.
- A light brush of melted butter on the cereal helps it bond without soggy spots.
- Cooling shells on a wire rack prevents steam from softening them.

Recipe by
AmeliaAmelia is a seasoned food blogger and recipe creator at CookDishWorld, where she blends culinary expertise with an unwavering love for sharing delicio ...
Get Delicious Recipes Weekly
Join 25,000+ home cooks getting our best recipes straight to their inbox.
Free forever • No spam • Unsubscribe anytime