Why You'll Love It
- - No oven needed, perfect for summer evenings
- - Customizable flavors and coatings
- - Quick assembly, beautiful presentation
- - Fun surprise that delights all ages
"The Ice Cream Bomb was a hit—kids loved the surprise crunch!"
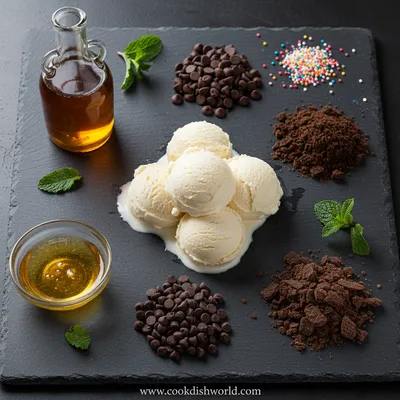
Essential Ingredient Guide
- Vanilla ice cream: Choose a high‑quality, creamy ice cream; let it soften just enough to scoop easily.
- Chocolate coating: Use dark or milk chocolate; melt gently to avoid scorching.
- Crushed cookies: Chocolate wafers or graham crackers add a satisfying crunch.
- Butter: A little butter mixed with crumbs helps the coating stick firmly.
- Lemon zest: A touch of zest brightens the sweet richness.
- Sprinkles: Optional colorful sprinkles for visual pop and a tiny snap.
Complete Cooking Process
-
Ingredient Readiness:
Soften the ice cream in the freezer for about 10 minutes, crush cookies, melt chocolate, and mix butter with crumbs.
-
Flavor Development:
Fold in lemon zest and a handful of sprinkles into the softened ice cream for a subtle lift.
-
Texture Control:
Roll scoops in the butter‑crumb mixture before dipping in chocolate to create a firm outer shell.
-
Finishing Touches:
Drizzle extra chocolate and add a final sprinkle of colorful gems right before the ice cream sets.
-
Serving Timing:
Serve immediately or keep frozen for up to an hour; the coating stays crisp if not left too long.
- Work quickly after melting chocolate – it thickens fast.
- Use a silicone mat for easy removal of coated bombs.
- Freeze the finished bombs on a tray to lock in the crunch.
Pro Tips
Well, I’ve found that a little patience during the coating stage makes all the difference. When the chocolate sets just right, the shell snaps cleanly, and the interior stays luxuriously cold. So, take a moment, enjoy the aroma of melting chocolate, and remember that a steady hand brings the best result. Ugh, there’s nothing like the first bite, is there?
The essence of the dish:
A fun fact or historical angle:
Flavor or sensory focus:
You Must Know
- Keep the chocolate warm but not hot
- Work with chilled ice cream for shape
- Don’t over‑coat or it becomes soggy
Frequently Asked Questions
→ Can I use dairy‑free ice cream?
Yes, a coconut‑based or almond‑based ice cream works well; just ensure it’s firm before shaping.
→ What chocolate should I choose?
A good quality couverture or candy melting chocolate gives a smooth shiny shell and firm snap.
→ How long can the bombs be stored?
They stay crisp for up to two hours in the freezer; beyond that the coating may soften.
→ Can I add a filling inside?
Absolutely—mix in caramel ribbons, cookie dough bits, or fruit preserves before refreezing.
→ Do I need special equipment?
A small ice cream scoop or spoon, a mixing bowl, and a silicone mat are enough.
→ How do I prevent the chocolate from cracking?
Stir gently while melting and keep the temperature just above 115°F to maintain a glossy finish.
Chef's Tips
Work quickly after dipping to keep the chocolate glossy.,If the chocolate sets too fast, re‑warm it briefly.,You can swap dark chocolate for white chocolate for a milder flavor.
Nutrition Facts
per serving
320
Calories
4g
Protein
34g
Carbs
18g
Fat
Taste Profile
A sweet, creamy bite with a crisp chocolate‑crust contrast
Ingredient Substitutions
Don't have an ingredient? Try these alternatives
Provides a dairy‑free option; may add a slight coconut aroma.
Creates a sweeter, milder coating; melt carefully.
Recipe Variations
Try these delicious twists on the original
Spicy Version
Add a pinch of cayenne to the chocolate for a subtle heat.
Mediterranean Style
Use pistachio crumbs and drizzle honey over the set bombs.
Common Mistakes to Avoid
Learn from others' mistakes for perfect results
- Leaving ice cream too soft – it loses shape.
- Over‑melting chocolate – it becomes grainy.
- Coating too thick – shell can become soggy.
Meal Prep & Storage
Make Ahead Tips
You can shape and freeze the ice cream balls up to 24 hours ahead; keep the chocolate coating separate until ready to serve.
Leftover Ideas
Store any leftover bombs in a sealed container in the freezer; re‑dip and re‑freeze if the coating softens.
Perfect Pairings
Serve this with...
Cooking Timeline
Gather and prep all ingredients; line the tray.
Blend ice cream with zest and sprinkles, form balls.
Freeze balls, coat with butter‑crumb mixture.
Melt chocolate, dip each ball, add final sprinkles.
Freeze quickly to set coating, then serve.
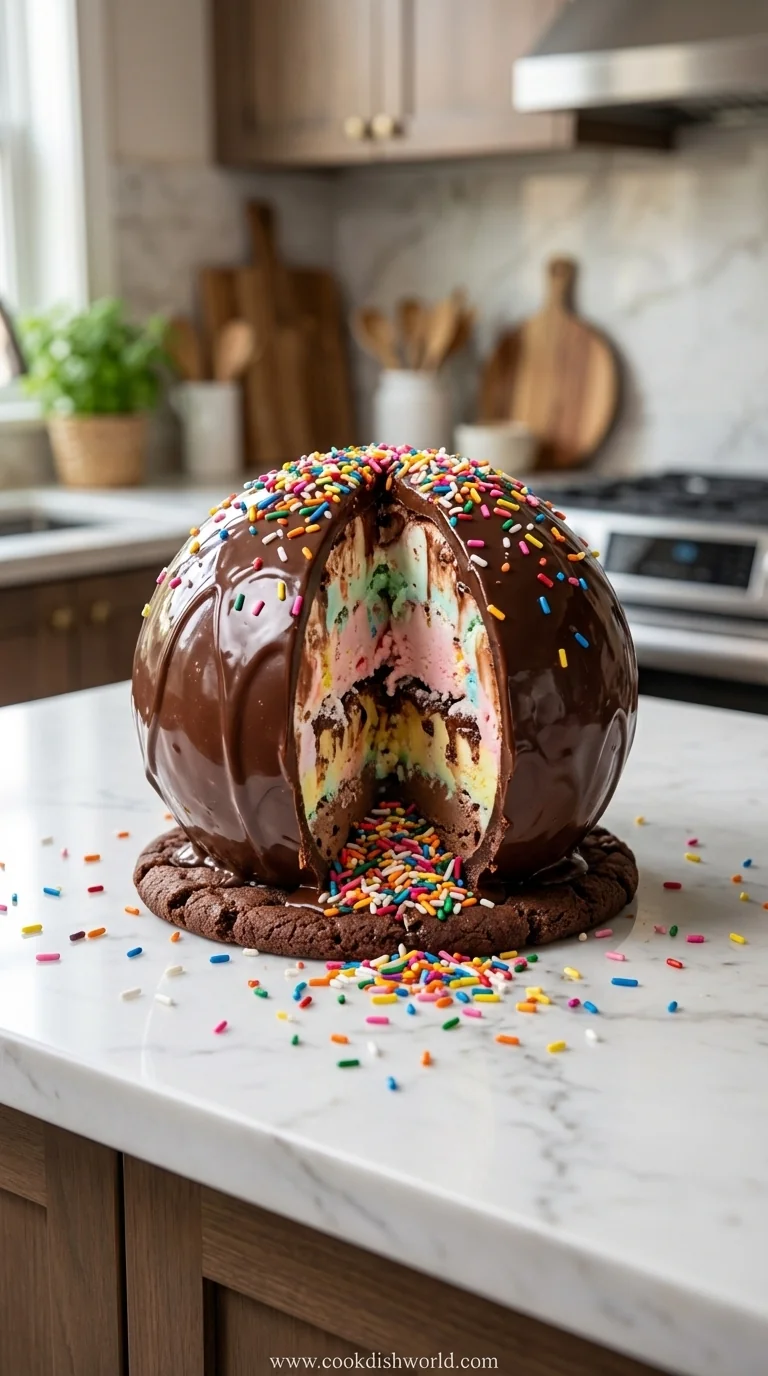
Ice Cream Bomb Recipe – Easy Dessert
A playful, no‑bake Ice Cream Bomb with creamy layers, a crisp coating, and a burst of texture—ready in minutes for a gathering or a sweet treat.
Timing
Prep Time
15 Minutes
Cook Time
0 Minutes
Total Time
15 Minutes
Recipe Details
Ingredients
Main Ingredients
- 01 1 quart vanilla ice cream, softened
- 02 200 g dark chocolate, chopped
- 03 100 g crushed chocolate wafers
- 04 2 tbsp unsalted butter, melted
- 05 1 tsp lemon zest
- 06 2 tbsp colorful sprinkles
Instructions
Line a baking sheet with parchment or a silicone mat and set in the freezer.
In a bowl, blend softened ice cream with lemon zest and half of the sprinkles; roll into 6 equal balls and place on the prepared sheet.
Freeze the ice cream balls for 10 minutes until firm.
Combine crushed wafers with melted butter; roll each frozen ball in this mixture to coat evenly.
Melt chocolate gently in a bain‑marie; dip each coated ball, letting excess drip off.
Sprinkle remaining colorful sprinkles on the wet chocolate, then return to the freezer to set for another 5 minutes.
Notes & Tips
- 1 Work quickly after dipping to keep the chocolate glossy.
- 2 If the chocolate sets too fast, re‑warm it briefly.
- 3 You can swap dark chocolate for white chocolate for a milder flavor.
Tools You'll Need
-
Small ice cream scoop
-
Mixing bowls
-
Silicone mat
-
Double boiler or microwave
-
Parchment paper
Must-Know Tips
- Don't over‑mix the ice cream, it can become grainy.
- Let the coated bombs set completely before moving them.
- Taste the crumb mixture; add a pinch of salt if needed.
Professional Secrets
- Room temperature chocolate coats better, but keep it warm.
- A thin butter layer helps the crumb adhere without soggy spots.
- Chill the final bombs on a metal tray for faster setting.

Recipe by
AmeliaAmelia is a seasoned food blogger and recipe creator at CookDishWorld, where she blends culinary expertise with an unwavering love for sharing delicio ...
Get Delicious Recipes Weekly
Join 25,000+ home cooks getting our best recipes straight to their inbox.
Free forever • No spam • Unsubscribe anytime