Why You'll Love It
- - No oven needed, perfect for hot days
- - Simple ingredients you already have
- - Creamy peanut butter flavor that feels homey
- - Quick to assemble, yet looks impressive
*"The texture was perfect—smooth filling, crunchy base. My guests begged for seconds!"*
Essential Ingredient Guide
- Peanut butter: Choose a smooth, unsalted variety for a velvety texture; stir well to avoid oil separation.
- Graham cracker crumbs: Lightly toast the crumbs for extra depth, then blend with melted butter.
- Cream cheese: Room‑temperature cheese mixes effortlessly, giving the filling body.
- Powdered sugar: Sifts fine to prevent grainy spots in the filling.
- Lemon juice: A splash brightens the richness and balances the sweet.
- Chocolate shavings: Garnish adds a subtle bitter contrast and visual sparkle.
Complete Cooking Process
-
Ingredient Readiness:
Gather all components, let the cream cheese soften, and toast the graham crumbs for a warm aroma.
-
Flavor Development:
Combine butter and crumbs, then press into the pan; the butter melts, creating a crisp base.
-
Texture Control:
Whisk peanut butter with cream cheese and sugar until airy, ensuring a smooth, silky filling.
-
Finishing Touches:
Drizzle melted chocolate over the set pie and sprinkle shavings just before serving.
-
Serving Timing:
Let the pie chill for at least two hours; this firms the filling and melds the flavors.
- Press the crust firmly for even stability.
- Use a chilled bowl for the filling to keep it firm.
- Add a pinch of sea salt to highlight the peanut butter.
- Top with crushed peanuts for extra crunch.
Pro Tips
I often pause after pressing the crust, feeling the buttery scent linger, and think about how simple pleasures linger in memory. The final drizzle of chocolate, done while the pie is still cool, gives a glossy finish that catches the light—and the eye. If you have a moment, let the pie rest a bit longer; the flavors become more harmonious, and each bite feels like a quiet celebration.
The essence of the dish:
A fun fact or historical angle:
Flavor or sensory focus:
You Must Know
- The crust should be pressed firmly but not over‑packed.
- Chill the pie long enough for the filling to set fully.
- Use high‑quality peanut butter for the best flavor.
Frequently Asked Questions
→ Can I use crunchy peanut butter?
Yes, but blend it longer to avoid graininess; the texture will be slightly more textured.
→ How long can the pie be stored?
Keep it refrigerated in an airtight container for up to 3 days; the crust stays crisp if covered well.
→ Is there a gluten‑free version?
Replace graham crackers with gluten‑free cookie crumbs and use a gluten‑free butter.
→ Can I add a topping other than chocolate?
Definitely—caramel drizzle, toasted coconut, or crushed pretzels work beautifully.
→ Do I need to pre‑bake the crust?
No, the butter melt bonds the crumbs without baking, keeping the prep quick.
→ What can I serve with the pie?
A dollop of whipped cream, a splash of milk, or a side of fresh berries complement the richness.
Chef's Tips
If the filling looks a bit thick, add a splash of milk to loosen it.,For extra crunch, toast the graham crumbs lightly before mixing with butter.,A pinch of sea salt can elevate the peanut butter flavor.
Nutrition Facts
per serving
420
Calories
9g
Protein
32g
Carbs
28g
Fat
Taste Profile
Rich, nutty, and gently sweet with a hint of citrus
Ingredient Substitutions
Don't have an ingredient? Try these alternatives
Use full‑fat Greek yogurt; the texture will be slightly lighter.
Milk chocolate yields a sweeter glaze; reduce added sugar if desired.
Recipe Variations
Try these delicious twists on the original
Spicy Version
Add 1/2 tsp cayenne pepper to the filling and sprinkle a pinch on top for a subtle heat.
Mediterranean Style
Swirl in a tablespoon of tahini and garnish with toasted sesame seeds for a nutty twist.
Common Mistakes to Avoid
Learn from others' mistakes for perfect results
- Over‑mixing the crust, leading to a soggy base.
- Adding too much lemon juice, making the filling overly tart.
- Skipping the chill step, resulting in a runny filling.
Meal Prep & Storage
Make Ahead Tips
You can prepare the crust and filling separately, store them refrigerated, and assemble just before serving for a fresh finish.
Leftover Ideas
Keep leftovers covered in the fridge; serve chilled or let sit a few minutes at room temperature for softer texture.
Perfect Pairings
Serve this with...
Cooking Timeline
Toast graham crumbs, melt butter, and combine for crust.
Press crust into pan and chill while preparing filling.
Beat cream cheese, add peanut butter, sugar, lemon, and cream; whisk smooth.
Spread filling, refrigerate to set.
Melt chocolate, drizzle over pie, garnish, and serve.

No Bake Peanut Butter Pie – Easy Dessert
A silky, no‑bake peanut butter pie that layers a buttery graham crust with a creamy, nutty filling, topped with a whisper of chocolate drizzle for a quick, indulgent dessert that feels like comfort on a plate.
Timing
Prep Time
15 Minutes
Cook Time
0 Minutes
Total Time
15 Minutes
Recipe Details
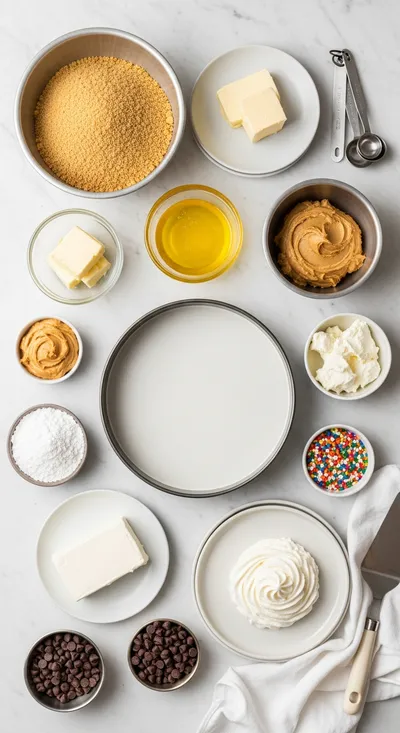
Ingredients
Crust
- 01 1 1/2 cups graham cracker crumbs
- 02 6 tbsp unsalted butter, melted
- 03 2 tbsp granulated sugar
Filling
- 01 8 oz cream cheese, softened
- 02 1 cup smooth peanut butter
- 03 1/2 cup powdered sugar
- 04 2 tbsp lemon juice
- 05 1 tsp vanilla extract
- 06 1/4 cup heavy cream
Topping
- 01 2 oz dark chocolate, melted
- 02 1 tbsp chopped peanuts (optional)
- 03 Chocolate shavings for garnish
Instructions
In a bowl, combine graham cracker crumbs, melted butter, and sugar; stir until the mixture resembles wet sand.
Press the crumb mixture firmly into the bottom of a 9‑inch springform pan, creating an even crust. Chill while you prepare the filling.
In a large mixing bowl, beat softened cream cheese until smooth. Add peanut butter, powdered sugar, lemon juice, vanilla, and heavy cream; whisk until light and airy.
Spread the peanut butter filling over the chilled crust, smoothing the top with a spatula. Refrigerate for at least 2 hours, or until set.
Once set, drizzle melted dark chocolate over the surface in a decorative pattern; sprinkle chopped peanuts and chocolate shavings if desired.
Notes & Tips
- 1 If the filling looks a bit thick, add a splash of milk to loosen it.
- 2 For extra crunch, toast the graham crumbs lightly before mixing with butter.
- 3 A pinch of sea salt can elevate the peanut butter flavor.
Tools You'll Need
-
9‑inch springform pan
-
Mixing bowls
-
Electric mixer
-
Spatula
-
Measuring cups and spoons
-
Small saucepan for melting chocolate
Must-Know Tips
- Don't over‑mix the crust; just combine until moist.
- Let the crust chill before adding filling to prevent sogginess.
- Taste the filling before chilling; adjust sweetness if needed.
Professional Secrets
- Room temperature cream cheese ensures a smooth blend.
- Melt chocolate slowly over low heat to keep it glossy.
- Press the crust with the back of a spoon for even pressure.

Recipe by
AmeliaAmelia is a seasoned food blogger and recipe creator at CookDishWorld, where she blends culinary expertise with an unwavering love for sharing delicio ...
Get Delicious Recipes Weekly
Join 25,000+ home cooks getting our best recipes straight to their inbox.
Free forever • No spam • Unsubscribe anytime