Why You'll Love It
- - No‑bake, so it stays chill and simple
- - Layers of texture from creamy to crunchy
- - Classic Oreo flavor that never gets old
- - Easy to customize with toppings or sauces
*"The cake was silky, the Oreo crunch just right – a real crowd‑pleaser!"*
Essential Ingredient Guide
- Oreo cookies: Choose classic chocolate Oreos for the authentic taste; crush them finely for the crust and coarsely for the topping.
- Heavy cream: Use cold, high‑fat cream for a smooth, stable ice cream base; it holds its shape when sliced.
- Milk: Whole milk adds richness without making the mixture too dense.
- Sugar: Balances the bitterness of cocoa; adjust to taste if you prefer a sweeter profile.
- Vanilla extract: A splash enhances the buttery notes and rounds the overall flavor.
- Chocolate ganache: For the glossy finish; melt slowly to keep the sheen.
Complete Cooking Process
-
Ingredient Readiness:
Gather all cookies, chill the cream, and have a sturdy springform pan ready; this ensures a smooth assembly.
-
Flavor Development:
Mix the crushed cookies with melted butter for the crust, then fold the vanilla‑infused ice cream with milk and sugar.
-
Texture Control:
Layer the crust, ice cream, and cookie crumbs carefully, letting each layer settle for a minute before the next.
-
Finishing Touches:
Drizzle the chocolate ganache over the top, sprinkle extra Oreo crumbs, and chill the cake for at least four hours.
-
Serving Timing:
Remove the cake from the freezer about ten minutes before slicing to allow clean cuts.
- Press the crust firmly to avoid crumbling.
- Use a rubber spatula for gentle folding.
- Freeze the cake on a tray to keep the shape.
- Add a pinch of sea salt to the ganache for depth.
Pro Tips
These little adjustments make a world of difference. I find that a gentle press helps the base stay together, especially when the cake sits out for a while. Also, the sea salt awakens the chocolate’s richness without overwhelming the delicate ice cream. Take a moment, breathe, and enjoy the process – it’s as comforting as the dessert itself.
The essence of the dish:
A fun fact or historical angle:
Flavor or sensory focus:
You Must Know
- Keep everything cold
- Do not over‑mix the ice cream base
- Allow the cake to rest before serving
Frequently Asked Questions
→ Can I use gluten‑free cookies?
Yes, substitute with a gluten‑free chocolate cookie; just make sure they are finely crushed for the crust.
→ How long can the cake be stored?
Keep it sealed in the freezer for up to two weeks; let it soften slightly before serving.
→ Do I need an ice cream maker?
No, you can use soft‑serve ice cream or a pre‑made vanilla ice cream as the base.
→ Can I add fruit layers?
Fresh berries work well; add them after the ice cream layer and before the final freeze.
→ What if I don’t have a springform pan?
A regular round cake pan lined with parchment and wrapped in plastic will do.
→ Is there a dairy‑free version?
Swap heavy cream for coconut cream and use a dairy‑free chocolate ganache.
Chef's Tips
Make sure the crust is tightly packed; it holds the ice cream in place.,If the ice cream is too hard, let it soften for a few minutes before mixing.,For extra shine, warm the ganache slightly before pouring.
Nutrition Facts
per serving
420
Calories
6g
Protein
45g
Carbs
22g
Fat
Taste Profile
Creamy sweet with chocolate depth
Ingredient Substitutions
Don't have an ingredient? Try these alternatives
Gives a subtle coconut flavor; keep the cake chilled longer.
Use high‑quality dark chocolate for richer depth.
Recipe Variations
Try these delicious twists on the original
Spicy Version
Add a pinch of cayenne pepper to the ganache for a subtle heat.
Mediterranean Style
Mix in crushed pistachios and a drizzle of honey for a nutty twist.
Common Mistakes to Avoid
Learn from others' mistakes for perfect results
- Over‑mixing the ice cream base, which can cause graininess.
- Not pressing the crust firmly enough, leading to cracks.
- Leaving the cake out too long before serving; slices may melt.
Meal Prep & Storage
Make Ahead Tips
You can prepare the crust and ice cream layers up to 24 hours in advance; keep them wrapped and refrigerated before the final freeze.
Leftover Ideas
Slice and enjoy directly from the freezer; if needed, warm a slice briefly in the microwave to soften the ganache.
Perfect Pairings
Serve this with...
Cooking Timeline
Crush cookies and melt butter; press crust into pan.
Whisk ice cream, milk, sugar, and vanilla; pour over crust.
Add Oreo crumbs and drizzle ganache; smooth top.
Cover and freeze for at least four hours.
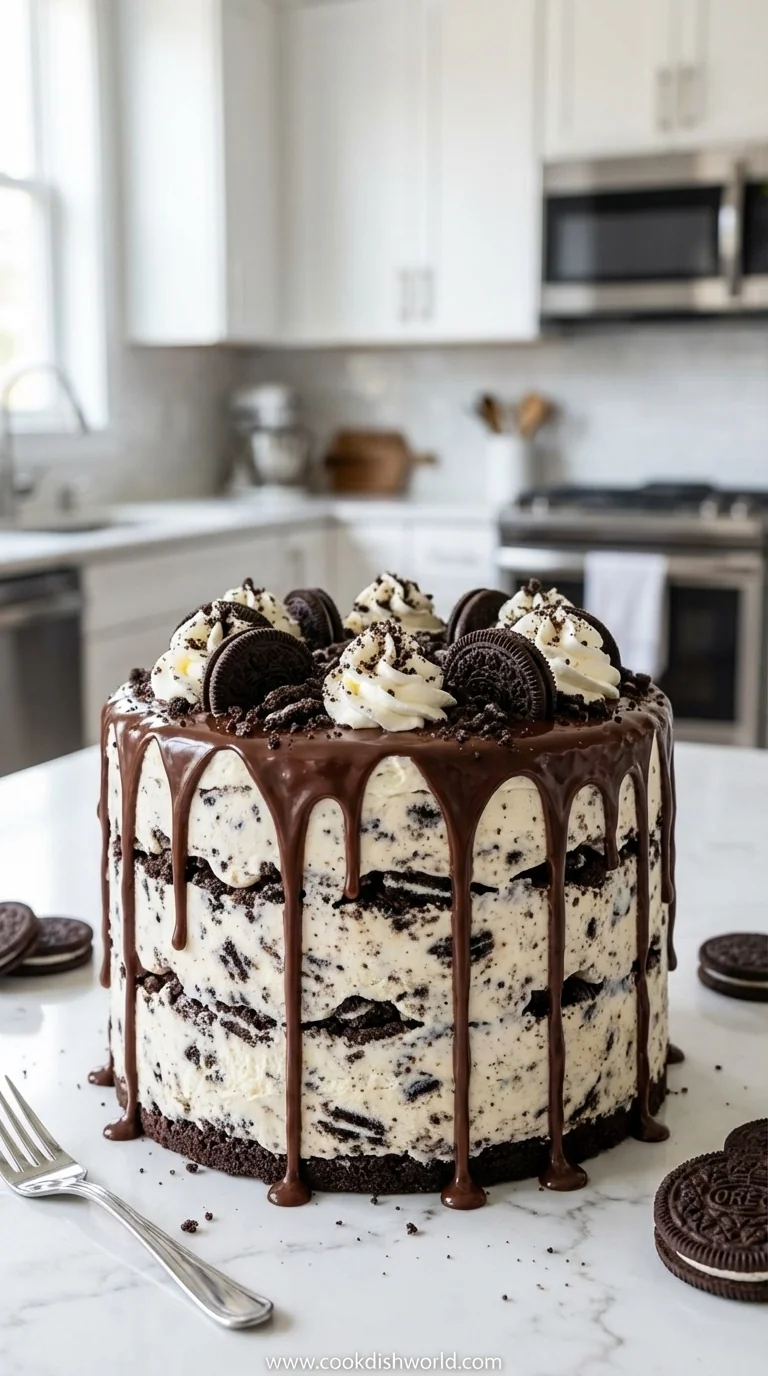
Oreo Ice Cream Cake
Indulge in a creamy, dreamy Oreo ice cream cake that balances sweet, buttery layers with the comforting crunch of real Oreo cookies, perfect for any celebration or quiet evening.
Timing
Prep Time
20 Minutes
Cook Time
0 Minutes
Total Time
4 Hours 20 Minutes
Recipe Details
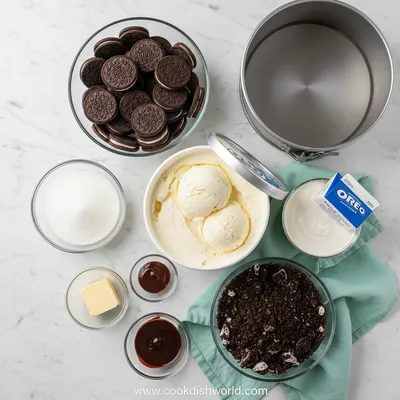
Ingredients
Crust
- 01 2 cups Oreo cookies, crushed fine
- 02 4 tbsp unsalted butter, melted
Ice Cream Layer
- 01 1 quart vanilla ice cream, softened
- 02 1/2 cup whole milk
- 03 1/4 cup sugar
- 04 1 tsp vanilla extract
Topping
- 01 1/2 cup chocolate ganache (store‑bought or homemade)
- 02 1/3 cup Oreo crumbs
- 03 Optional: a pinch of sea salt
Instructions
Begin by crushing the Oreo cookies in a zip‑top bag; press with a rolling pin until fine.
Mix the crushed cookies with melted butter until the mixture resembles wet sand; press firmly into the bottom of a 9‑inch springform pan.
In a large bowl, whisk together softened ice cream, milk, sugar, and vanilla until smooth; pour over the crust, spreading evenly.
Sprinkle the remaining Oreo crumbs over the ice cream layer, then drizzle the chocolate ganache on top; gently swirl with a knife if desired.
Cover the pan with plastic wrap and chill in the freezer for at least four hours, or until firm.
To serve, run a hot knife under warm water, wipe dry, and slice cleanly; garnish with a dusting of crushed Oreos.
Notes & Tips
- 1 Make sure the crust is tightly packed; it holds the ice cream in place.
- 2 If the ice cream is too hard, let it soften for a few minutes before mixing.
- 3 For extra shine, warm the ganache slightly before pouring.
Tools You'll Need
-
Springform pan
-
Rolling pin
-
Mixing bowl
-
Spatula
-
Plastic wrap
Must-Know Tips
- Don't let the ice cream melt too much; keep it cold while mixing.
- Press the crust firmly to avoid cracks.
- Taste the ganache and add a pinch of sea salt for depth.
Professional Secrets
- Freeze the mixing bowl for extra cold temps; helps keep ice cream smooth.
- Use a rubber spatula to fold gently; prevents air bubbles.
- Chill the ganache just enough to stay glossy without hardening.

Recipe by
AmeliaAmelia is a seasoned food blogger and recipe creator at CookDishWorld, where she blends culinary expertise with an unwavering love for sharing delicio ...
Get Delicious Recipes Weekly
Join 25,000+ home cooks getting our best recipes straight to their inbox.
Free forever • No spam • Unsubscribe anytime